


Data gathering is a term that has been heavily used in the past decade. Every company wants to know their customers fully so the organization can develop the best strategy to solve people’s problems. Usually, technology-based organizations have data lakes to get data for analysis. But, sometimes, they have to gather the data online for
Data gathering is a term that has been heavily used in the past decade. Every company wants to know their customers fully so the organization can develop the best strategy to solve people’s problems. Usually, technology-based organizations have data lakes to get data for analysis. But, sometimes, they have to gather the data online for various analyses, such as sentiment analysis, SEO analysis, and monitoring. Web scraping is the approach to extracting data from a targeted source and saving it in local or cloud storage. Python is the best programming language to perform web scraping. There are many libraries in Python that can help you scrape data from websites, blogs, and other sources online. The most famous ones are BeautifulSoup and Selenium. In this article, we will see how to perform selenium web scraping.
What Is Web Scraping?
Web scraping is extracting a large amount of data from various web pages online. Nowadays, machine learning and AI beginners invest a lot of time learning different ways to web scrape. Web scraping consists of two parts, namely crawler, and scraper. The crawler is responsible for finding and locating the necessary data from the target source, then the scraper helps extract that data from the source.
Selenium – What Is It?
Selenium is a free and open-source python library that is an automated testing framework mainly used for testing and validating web applications across various browsers. You can use any programming language, such as C#, Java, and my favorite one, Python. Selenium software is a suite of tools consisting of:
- Selenium Integrated Development Environment (IDE).
- Selenium Remote Control.
- Webdriver.
- Selenium Grid.
Let’s see how to use Selenium with Python to automate the whole web scraping process.
Problem Statement:
We aim to scrape the names and salaries of NBA players for the last decade, then save the data in data frame format. NOTE: To learn and explain how Selenium web scraping works, we use the hoopshype website.
Installing Chrome Driver:
Before you start the web scraping process, it is necessary to install the Chrome driver on your computer. Which Chrome driver you install is based on the version of the Chrome browser you are using. You can check it by following these steps:
STEP 1: Open Chrome browser—> Click the “Hamburger” icon, which is present in the top right corner of the browser.
STEP 2: After clicking the “Hamburger” icon, you will see the option “Help.” Click on “Help” and select “about chrome browser.” Once you do that, you will get the version page. The image below represents the version page for Google Chrome.
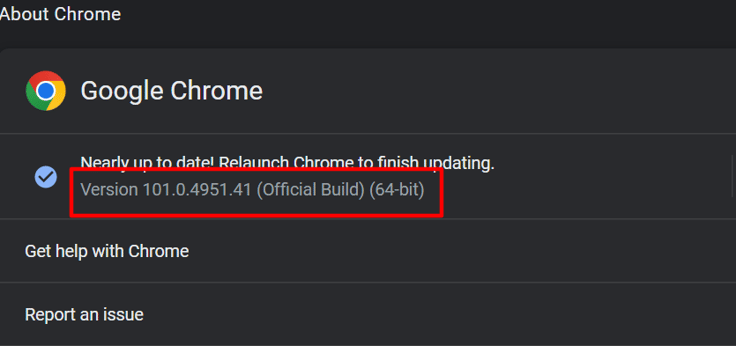
Google Chrome Version Window
Note: If you have any updates, it is best to install these updates before installing the chrome driver.
Once you find out the version, go to the chrome driver website and download the driver based on the version of Chrome you have.
Install Selenium:
The easiest way to install the selenium package is through PIP (Package Installer Python). You can open any notebook, either Juypter or Google Collab, and type the following python code:
pip install seleniumThe above command downloads all the dependency packages for Selenium. Now, let’s see how to implement web scraping with Selenium.
Web Scraping with Selenium:
We recommend creating a virtual environment and implementing the web scraping process for better practice. Let’s use the Juypter notebook to web scrape in this example.
STEP 1: Import all the necessary libraries. Pandas and the Selenium webdriver are the main libraries for simple web scraping. The python code to import all the required libraries is shown below:
from selenium import webdriver
from selenium.webdriver.common.keys import keys
import pandas as pd
STEP 2: Once you import the libraries, the next step is to initiate the Chrome driver. The python code is shown below to initiate the driver
driver = webdriver.Chrome(r"\Selenium\chromedriver.exe")NOTE: In the argument, mention the full path of the Chrome driver location on your local system.
STEP 3: Once you initiate the driver, the Chrome browser should open in a new window. But the window should be empty since there is no feed URL. The python code for the target feed URL is shown below:
seed_url = 'https://hoopshype.com/salaries/players/'
driver.get(seed_url)
STEP 4: Once the feed URL is entered, in the new window, you should be able to see the target website. The following process is to find the name of every NBA player. In Selenium, you can find the HTML elements by the following methods:
- ID
- CSS selector
- XPATH selector
- Name
- Class name
- Tag name
In our example, let’s see how to detect the elements using the XPATH selector. We want to extract two details from this data:
- Player’s Name
- Salary
Note: It is also possible to use the search form to find web elements. The search form is located at the bottom of the Inspect page.
STEP 5: When you land on the target page, you should see a list of players and their salaries for the seasons (year). Select any one of the player names and right-click it. You will get several options. In those options, click on “Inspect.” The image below represents the Inspect page.
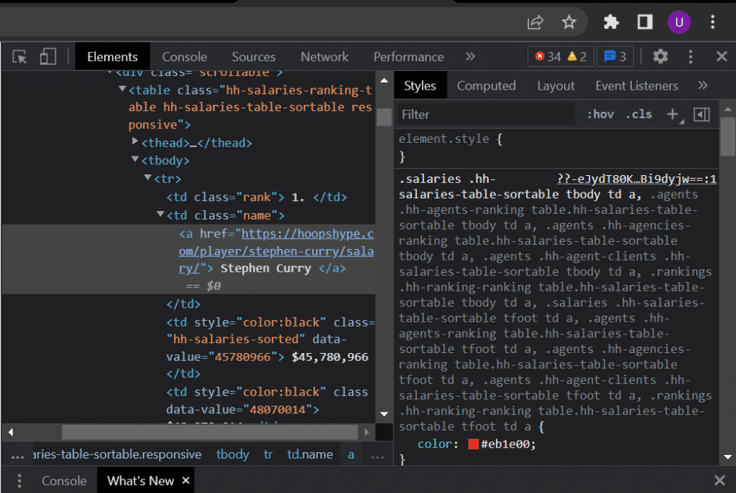
Inspect Page of Target SIte
Now, as mentioned above, the aim is to extract the players’ names. So, the first step is to find a single-player element and the common factor among all the player elements. So, in the same process, right-click on the player name and inspect it. This should take you directly to your element location. Instead of taking one player’s name in our scenario, we are taking all the players’ names. The common element among all the players is “td class-‘name’.” So, if we use this element and loop it, we will get all players’ names. The python code to extract the name of a player is shown below:
nba_players = driver.find_elements_by_xpath('//td[@class="name"]')
players_list = []
for p in range(len(nba_players)):
    players_list.append(nba_players[p].text)
print(players_list)
Explanation: As mentioned above, we are finding the HTML code element by using the XPATH approach. Obviously, we need the XPATH path of multiple elements. The easiest way is to find the name element, which is “td class-name.” Right-click on the element and select “Copy.” You should get many options, such as copy JS path and copy XPATH. Select copy XPATH, and you should automatically get the XPATH location of the element. Paste the path in the find_elements_by_XPATH argument. Once you paste the path, Python should start to identify these elements and get their addresses, not the actual name. To get the players’ actual names, we are going to loop the function and append the results to an empty list as an output. Once you execute the above code snippet, you should get the output as shown in the image below.

Output for Extracting Players’ Name
Now that we have the names of the players, the next step is to get their respective salaries. The exact process of extracting the name is carried out to get the salary details.
STEP 6: Salary data is extracted using the python code as shown below:
players_salary=driver.find_elements_by_xpath('//td[@class="hh-salaries-sorted"]')
salary_list=[]
for s in range(len(players_salary)):
    salary_list.append(players_salary[s].text)
print(salary_list)
Explanation: The process is the same. The only difference is the common element among the players. The web element “td class-‘hh-salaries-sorted'” was the common element. After finding the element, we create an empty list to loop the whole function and append the salary details to the empty list. The output should look like the image shown below:

Output for Extracting Players’ Salary
STEP 7: Now, we have scraped data from our target. But, if you look closely, the data is only for one season (current year). Our problem statement says to extract the data for the past decade. This is where browser automation comes into the picture. No need to worry. We can use the same code for the season as the loop function. The python code to automate the scraping process and procure the data for the past decade is shown below:
for i in range(2010,2021):
    page_number = str(i) + '-' + str(i+1) +'/'
    feed_url = 'https://hoopshype.com/salaries/players/' + page_number
    driver.get(feed_url)

    players = driver.find_elements_by_xpath('//td[@class="name"]')
    salaries = driver.find_elements_by_xpath('//td[@class="hh-salaries-sorted"]')

    player = []
    for j in range(len(players)):
        player.append(players[j].text)

    salary = []
    for k in range(len(salaries)):
        salary.append(salaries[k].text)
Explanation: As mentioned above, we aim to get the data for the last ten years. To do that, we have to implement pagination. Pagination is the process of adding consecutive numbers, usually page numbers, to identify the order sequence of the page. The seasons are represented in the YYYY/MM format. To recognize that, we are using the concatenation technique. After that, we use the same process and same code within the loop.
STEP 8: The last step is to save the data in the data frame for various analyses, such as sentiment analysis and competitive analysis. The python code to save the data in the data frame as shown below:
df = pd.DataFrame(columns=['Player','Salary','Year'])
data = list(zip(player[1:],salary[1:]))
df1 = pd.DataFrame(data, columns=['Player','Salary'])
df1['Year'] = i
df = df.append(df1)
NOTE: In the second line of the code, you can see that I did slicing. The reason behind this was when you see the output for both players’ names and salaries, the first index, i.e., index 0, was the “PLAYER” and “DATE.” These items do not bring much importance to the table. So, we can drop those items.
Explanation: We created an empty frame with “Player,” “Salary,” and “Year” as the columns. We accumulate all the data into a single list with the Zip function to append the list to the data frame. Once the data is added to the data frame, it is time to end the automation and close the driver. You can save the data frame into a CSV file for a data repository if needed.
That’s it! You have successfully done automation and web scraping using Selenium and Python.
FAQs:
1. Is Selenium suitable for web scraping?
2. Which is better, BeautifulSoup or Selenium?
3. What are the best tools for web scraping?
Conclusion:
This article shows how to install a Chrome driver to your local system to automate a small web scraping process. In real-time, handling a large amount of data (in terms of size, such as MB, GB, and sometimes TB) involves complex steps. Selenium is a good start for beginners interested in data gathering, screen scraping process, and data science in general. As mentioned, a complex web scraping process requires a lot of time to gather the data. Most websites do not allow web scraping for an extended period; once you reach that threshold the website will likely block your IP address and stop your web scraping process. To avoid such difficulties, it is recommended to use a proxy. ProxyScrape provides excellent residential proxies that are best suited for high-demand tasks, like web scraping.
DISCLAIMER: This article is strictly for learning purposes only. Without following the proper guidelines, performing web scraping may be illegal. This article does not support illicit web scraping in any shape or form.