


Have you ever encountered a situation where you need to have a blog on your existing company website that does not run on WordPress? I’m sure most of you have confronted such scenarios. In this article, you’ll discover a way to achieve it without compromising SEO. Before we dive into it, let’s explore how the
Have you ever encountered a situation where you need to have a blog on your existing company website that does not run on WordPress? I’m sure most of you have confronted such scenarios.
In this article, you’ll discover a way to achieve it without compromising SEO.
Before we dive into it, let’s explore how the organizations and institutions make use of hosting the blog separately from the main website.
Circumstances where you need to have a separate blog from the main website?
Many large businesses have complicated IT systems, making it difficult for their internal departments to look outside the scope of their internal systems. Take, for example, the content marketing department’s desire to create a blog for enlightening its audience. However, the present arrangement makes creating a blog, such as on WordPress hosting impossible.
On the other hand, businesses may use the “.NET Framework” for their web applications, and other companies are hesitant to use Open-Source frameworks.
When you need to host a blog in any of the scenarios listed above, you have no choice but to think of an alternative server to host it. This server is thus outside the server where you have hosted your website. Let’s look at some of these options and the impacts they would have, shall we?
What are your options for hosting the WordPress blog separately?
Hosting on a subdomain
For example, if your main website has a URL of www.myorganization.com, the most technically competent professionals of the past would be inclined to install the WordPress blog by purchasing a subdomain of the main domain. As an example in this situation, it would be on ourblog.myoraginzation.com.
In yesteryear, this solution would be perfect. However, currently, when you’re targeting to generate a considerable amount of traffic to your blog, you need to consider the SEO( Search Engine Optimization) aspects as well. We will look into it in the next section.
Impact of installing the blog on a subdomain for SEO
When to Use a Subdomain
The primary reason site owners purchase subdomains is to have separate content based on various products for your brand. While there can also be other reasons, such as a separate website for mobile and driving traffic, the fundamental reason lies in content and expanding your brand based on several niches.
For example, Wikipedia has subdomains to separate content based on various languages, such as fr.wikipedia.com or es.wikipedia.com.
NPR, a popular radio network, is another example where they focus 100% on their news and content. However, they also have a subdomain, https://shop.npr.org/, which concentrates mainly on merchandising.
So in the scenarios mentioned above, it makes sense to have a subdomain. But how about in the case of blogs?
Subdomain or separate folder for blogs?

Well, the search engines view the subdomains as separate websites. This implies that search engines have to crawl and index each subdomain separately. Also, the backlinks to the main domain do not get shared with their subdomains. Thus, building the page rank for a subdomain is almost as difficult as it is for the primary domain.
So it would help if you had subdomains in circumstances where it makes sense to do so. Therefore, an ideal option in blogs would be to have the blog as a subdirectory on your main site.
However, as I have mentioned above, how can you do so in circumstances where your leading site operates and when you hot it on a different platform that does not support WordPress hosting?
This is precisely what Reverse Proxies are for, and we”ll provide you with an overview of reverse proxies in the next section.
What are Reverse and Forward Proxies?
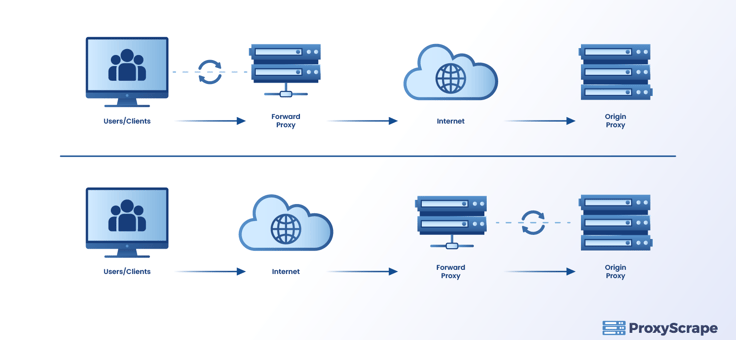
Understanding the concept of reverse proxy would be easier if you knew what a forward proxy does.
Forward Proxy – A Forward Proxy forwards all the incoming requests from all the nodes in LAN(Local Area Network) to the relevant server to which the request should go to. The destination server has no clue about the request’s origin and sends the response to the client who initiated the request via the forward proxy. The diagram below illustrates it
Reverse Proxy: In contrast, a Reverse Proxy sits in front of the servers and sends a request to the correct server when the client initiates a request. Then when the appropriate server returns the response, the reverse proxy returns the response to the client device. It would appear to the client device as the Reverse Proxy Server processed all the requests. Reverse Proxies are ideal in situations where the same portion of a web application is scaled down on many different servers.
To find more about Reverse and Forward proxies, you can refer to this article.
Reverse Proxy in a WordPress Scenario
Likewise, you can use a Reverse Proxy to direct the traffic to the server where you have hosted the WordPress blog. On the other hand, the Reverse Proxy will direct the non-blog traffic to the relevant server. I know it’s easier said than done. So Let’s demonstrate with an example.
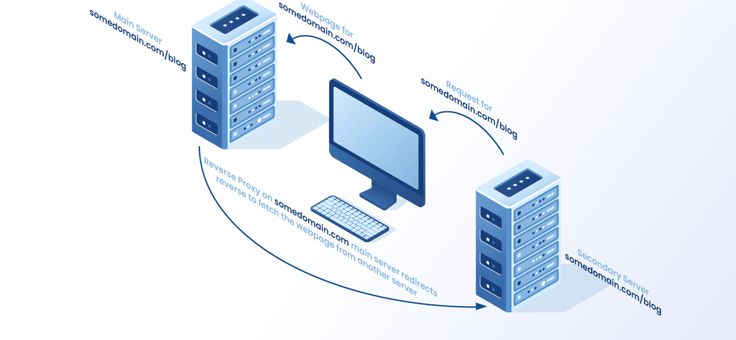
Let’s say that, as shown in the below diagram, your website is https://www.somedomain.com hosted on a web server that does not support WordPress.However, your content marketing team is dying to have a blog. So considering all the SEO facts mentioned above, your Web development team has no option but to install the blog under the “blog” directory. Therefore the blog, URL would appear as https://www.somedoamin.com/blog.
Since the main website does not support WordPress, here are the steps that your web development team has to follow:
- Contact the Administrators at somedomain.com and find out if they support Reverse Proxy.
- If they do, you could request them to configure the Reverse proxy at their server with the details in which you host the WordPress blog.
- Parallel with the above step, you also need to find a host server like Kinsta to run your WordPress blog. This blog would now have a separate IP address since it’s hosted differently from the web server that hosts your main website.
- You would need a URL for this blog, which should be https://www.somedomain.com/blog.Since a domain that can not have a folder in the root domain; the best way is to have the subdomain https://blog.somedomain.com point to this new server.
- Then you can configure the Reverse Proxy in a way so that if a request comes as https://www.somedomain.com/blog, such requests will direct to the subdomain https://blog.somedomain.com.This step requires you to create a folder called “blog” in the root directory of somedomain.com. Then it would help if you placed the following file naming it as “web.config” with the code below.
Creating the web.config file
<?xml version="1.0" encoding="UTF-8"?>
<configuration>
 <system.webServer>
  <rewrite>
   <rules>
    <rule name="blog.somedomain.com" stopProcessing="true">
     <match url=".*" />
     <conditions>
      <add input="{HTTP_HOST}" pattern="^blog.somedomain.com$" />
      <add input="{PATH_INFO}" pattern="^/blog/" negate="true" />
     </conditions>
     <action type="Rewrite" url="\blog\{R:0}" />
    </rule>
   </rules>
  </rewrite>
 </system.webServer>
</configuration>
In the below two lines, the “blog.somedomain.com” should be replaced by your subdomain where your blog is located:
 <rule name="blog.somedomain.com" stopProcessing="true">
<add input="{HTTP_HOST}" pattern="^blog.somedomain.com$" />
Then in these two lines, you may replace the “blog” folder if you have given a different name to it:
<add input="{PATH_INFO}" pattern="^/blog/" negate="true" />
<action type="Rewrite" url="\blog\{R:0}" />
In the final step, although we have used a subdomain, it will not affect the SEO as the traffic will be generated to the main website’s blog folder. Hence the Re-direction to the subdomain is an internal process that would not affect the SEO.
How should you create a Reverse Proxy in Apache Server?
The Circumstances discussed above are when you are running a server that doesn’t support PHP. However, if you run into a scenario where your leading site is running PHP or Drupal, for instance, but you want to have a different site for the blog in the same domain, you need to configure the Reverse Proxy according to the below steps.
But before that, you need to make sure that you have two sites up and running. One is https://www.somedomain.com, and the other is with WordPress Installed with subdomain,https://blog.somedomain.com.
First of all, you need to open the Apache server’s terminal via SSH. Then you need to enable Apache’s proxy module using this command:
sudo a2enmod proxy proxy_http sslThis command will restart Apache on most occasions to reload the new directives that you have defined above:
Next is the step that you have been waiting for. That is creating the reverse proxy by editing the server’s virtual host file.
<VirtualHost *>
DocumentRoot /var/www/app/public
SSLProxyEngine On ProxyRequests off
ProxyPass /blog http://blog.somedomain.com
ProxyPassReverse /blog http://blog.somedomain.com
</VirtualHost>
Two vital points to note here is:
- ProxyPass: Will create a reverse proxy for the path mentioned above
- ProxyPassReverse: The HTTP response headers delivered through this reverse proxy will be intercepted and rewritten to match the Apache server.
Now the next steps are for WordPress, which is typical for both of the above scenarios.
Updating WordPress
Then you need to go to the server where you have installed WordPress and update the wp-config.php file. This is because you don’t usually configure WordPress to run on a reverse proxy.
So you have to update the wp-config.php file as below:
$_SERVER[‘REQUEST_URI’] = str_replace("/wp-admin/", "/blog/wp-admin/", $_SERVER[‘REQUEST_URI’]);
Then in the same file, you update the following variables:
In the meantime, you can update the Database configuration values as below:
UPDATE wp_options SET option_value = 'https://www.somedomain.com/blog' WHERE option_name IN('siteurl', 'home');
The next step is to modify the .htacess file so that you can rewrite the URLs correctly:
Becomes:
RewriteRule . /blog/index.php [L]
After completing all of the above steps, you need to ensure that the post and the category links are working as expected. To do so, you need to log in with the old subdomain URL like below:
blog.somedomain.com/wp-login.php
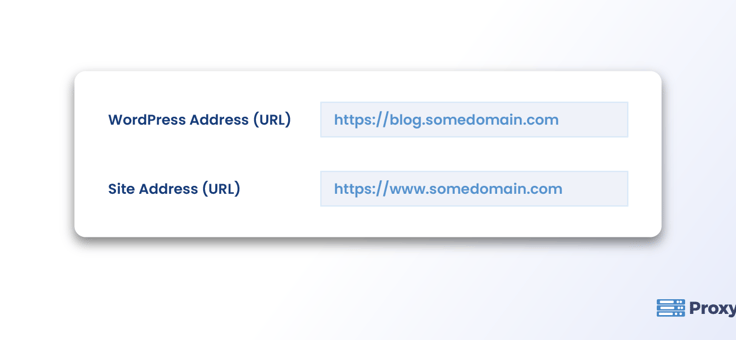
Then it would help if you navigated to ‘settings’ from the main dashboard and then clicked on the “General” tab.
In the Site Address (URL) field update as below:
After doing so, if you’re still in doubt if the URLs would work correctly, then you can install the “Better Search Replace” plugin. It would update all the records on your database where necessary.
Furthermore, you must also be cautious of updating canonicals and robot.txt.
After doing so, if you’re still in doubt if the URLs would work correctly, then you can install the “Better Search Replace” plugin. It would update all the records on your database where necessary.
Furthermore, you must also be cautious of updating canonicals and robot.txt.
Conclusion
Now you may have discovered that WordPress is highly customizable. This is because you can use WordPress to host only the blog part of the website separately while untouching the rest. As you have seen through this blog, the rest of the website might be hosted on different platforms that do not support WordPress.
So including the blog to the rest of the website can be a challenging task. However, you can overcome them by using reverse proxies.
Stay tuned for further articles.